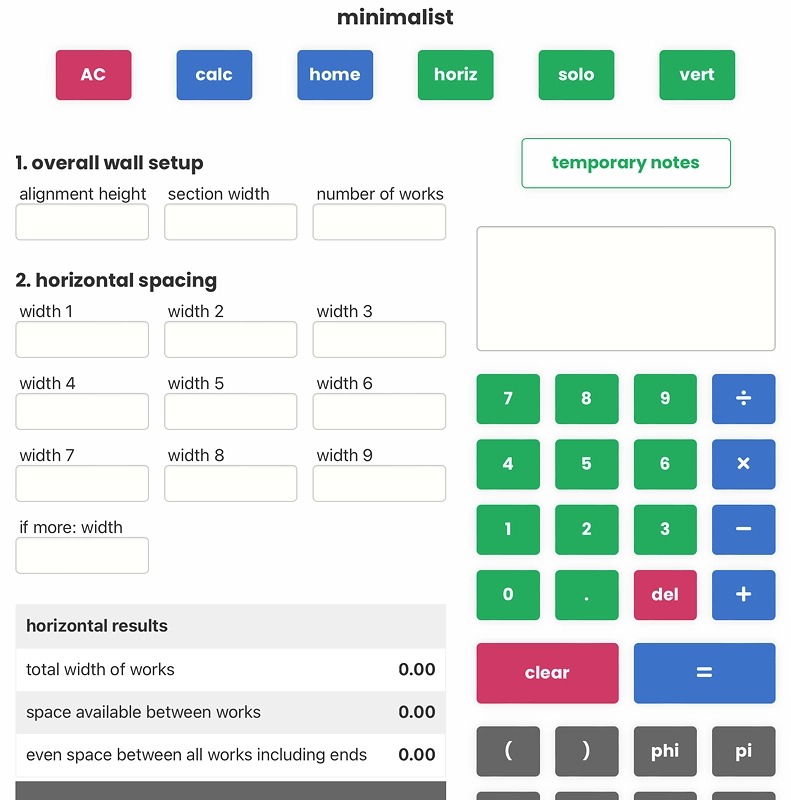
picture hanging measurements

free gallery wall calculator makes positioning fasteners easy so you can focus on the installation layout

  • suitable for home or gallery
  • use one or two hook methods
  • full version is at hangcalc.com a progressive web app you can add to your home screen

Input what you need to, choose the results you want

There are many ways to install pictures depending on fastening methods available, personal preferences, tools and equipment. Hangcalc can help in various scenarios and for different personal methods or processes. Everything can be done with a pencil, tape measure and spirit level (ideally one with a measurement scale on it).

The main calculator is for horizontal row layouts. Use solo to install works one by one in any position. Use horiz to calculate horizontal spacings and for vertical groups use vert button.

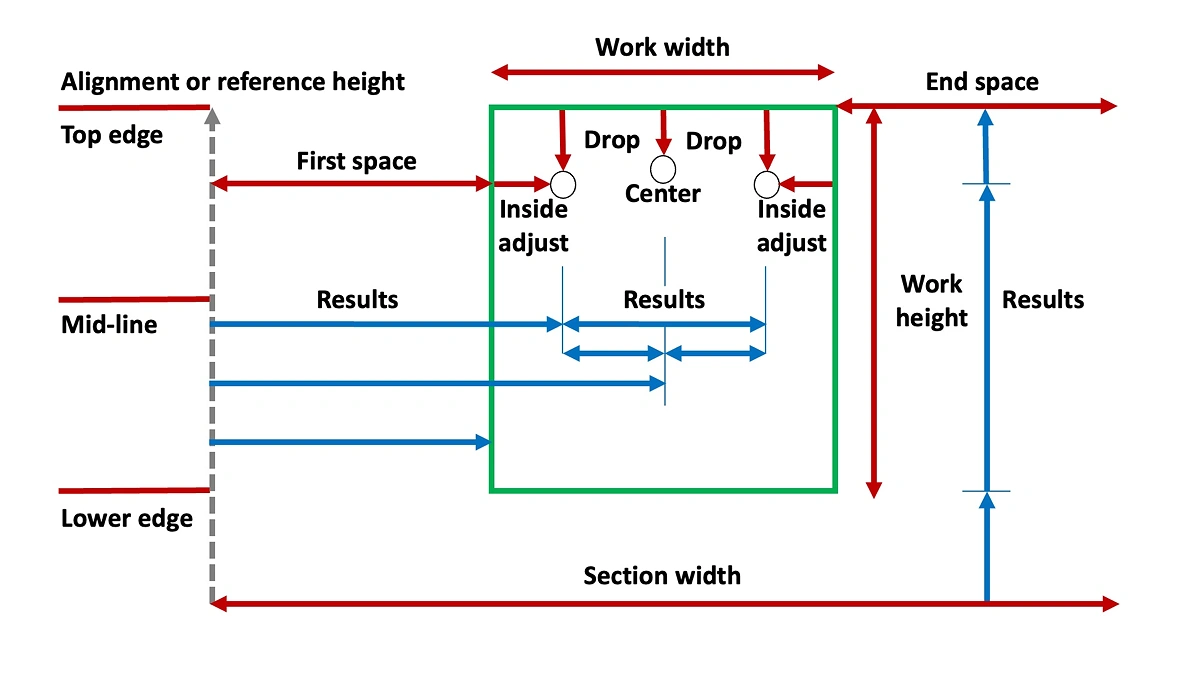
Required work measurements

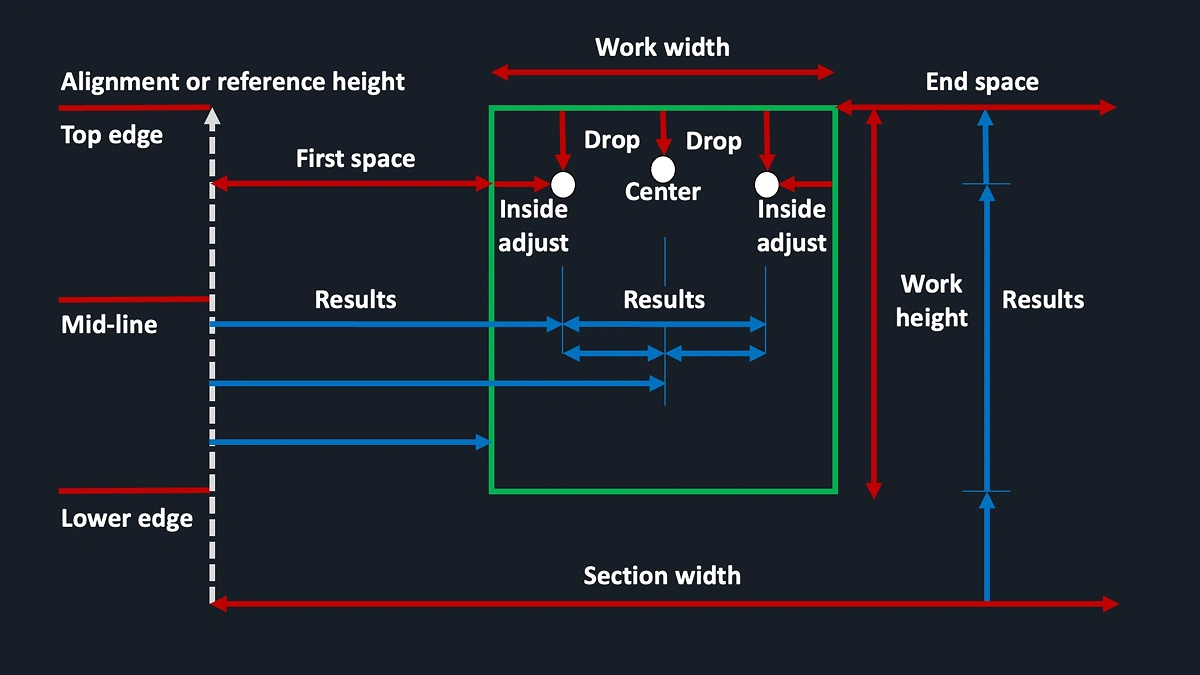
To complete a calculator generally three or four measurements may be needed for each artwork:

  • vertical:
    1) outer vertical height
    2) drop to fastener(s)

  • horizontal:
    1) outer horizontal width
    2) inside adjustment to fasteners (if using more than one)

An artwork dimensions PDF template is provided below so you to collect required measurements for each work in advance

Note an work's center point (mid-line alignment height) is generally suggested to be 57 inches or 1450 mm high. Spacing between works will be closer in clustered works - perhaps 3 inches or 80 mm, but wider to expansive layouts.

Basic approaches to hanging a work

Often works are placed personal preference, with a "yes, it feels right just there". There are two simple ways to determine fastener positions:

1) mark a corner (top or lower edge) and measure from there

  • hold a work against the wall where you want it to be and using a pencil mark the wall where a corner is. Measure how high that corner mark is
  • complete solo calculator using the corner height as the "reference height" then read out vertical result, ie. select top edge or "lower edge at reference" (depending on which corner). Measure vertically up or down from the corner to "height of fastener(s)" and make a mark
  • then read horizontal results with "to previous edge" being zero and then measure horizontally from that new mark to the center or first/second fasteners. Mark those points and place fasteners

2) mark a vertical centerline position and measure from there

  • decide where you want the work's centerline to be, eg. half way between two points or to one side (maybe using golden ratio (length/phi) and using a pencil mark the wall where the centerline will be
  • hold the work against the wall roughly on the centerline and mark the height of the top or lower edge. Measure how high that mark is
  • complete solo calculator fields using the marked height as the "reference height" then read out fastener height result, ie. for "top edge at reference" or lower edge (depending on which edge). Measure vertically up or down through the centerline mark to fastener height and mark that point; then place a fastener
  • if using two fasteners, measure horizontally from that point to the "distance from centerline to fasteners"

These approaches can be used with more precision if you decide a "reference height" and horizontal spacing in advance, eg. if you want/need a particular height for the lower edge or mid-line etc. to avoid objects or meet specifications.
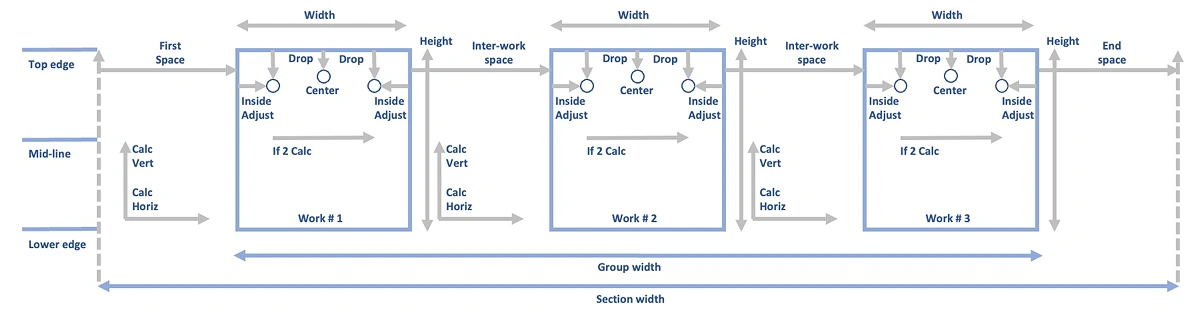
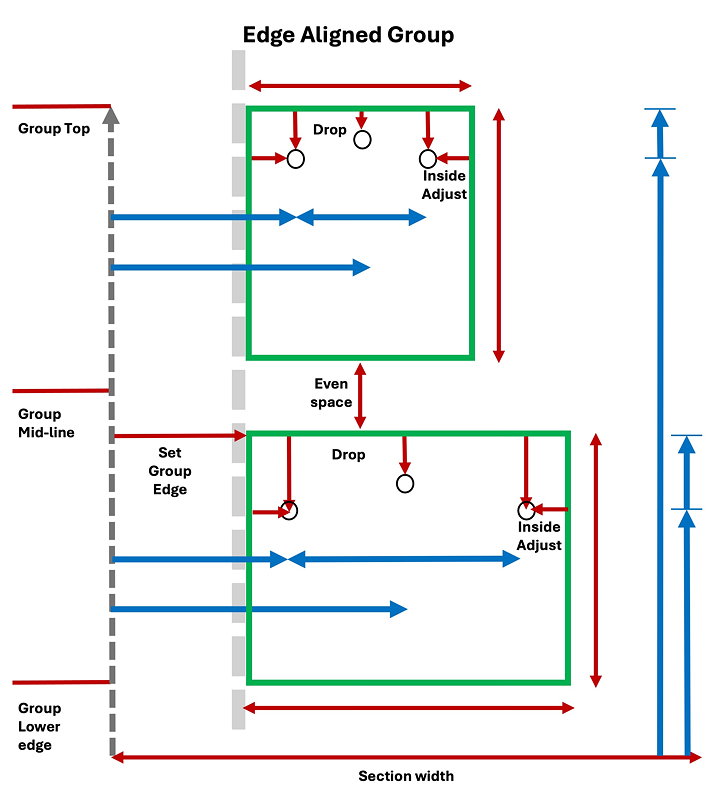
Groups and plans

If installing groups of works, they can be laid out in front of the wall on the floor then arranged and rearranged until the set feels right. Maybe so that no one piece dominates and there is an appealing distribution of content, colors and tones etc. and good distances between works. After that, do a sketch on paper with key parameters, like target heights, centerlines, inter-work and end spaces, if and as required. These will set the key points for use in one or more calculator: horiz for horizontal spacings and for vert for vertical groups

You might proceed to install works one by one using solo, and being in a group, add a "to previous edge" distance for horizontal spacing. Alternatively, work details can be gathered in advance using one or more of the PDF templates provided below and the whole group layout can be planned on paper, including heights, widths and fastener locations. These locations can then be transferred onto the wall. It can be useful to use a few inches ofpainter's tape to mark key points for groups, such as section widths and key alignment heights to help transfer the plan. Cross-line lasers can also be very useful for such work.

Just complete inputs you need, eg. for horizontal or vertical measurements, then choose the results you want.

Have fun!

picture hanging calculator diagram

main calculator

The main calculator has three steps: first plan and define overall installation on one or more walls or sections of walls, next determine horizontal spacing, then locate fastener positions for individual works and install them.

step 1. plan overall setup

recommended process

  • plan your layout for one or more wall or wall sections
  • decide final number and arrangement of works and place works near their final positions
  • collect precise size and measurements of each work. PDF templates in help can be used for this

step 2: use horizontal spacing calculator to give more precise even inter-work and end spacings. Explore options to choose the right one for your situation. Horizontal sections, group edges or centerlines can then be marked on a wall using pencil or painter's tape

step 3 use vertical reference height, previous horizontal measurements and detailed work measurements to determine the location of fasteners for individual works. Vertical alignment options include top edges, mid-lines or lower edges. If a vertical group is in a work position use vert.

Type notes here

This field is required

step 2. horizontal spacing

details
  • enter section width and number of works
  • enter outer widths of all works in the section
  • outer width of a vertical group may be width of widest work in that position

options shown:

  • options are for symmetrical layouts
  • shown first is an even spacing for the wall section including first/end spaces
  • adjustments can be made to the layout including first and end spaces. An even space and total available space for ends are shown. The total available can be used to make asymmetrical layout in the wall section
  • alternatively just focus on the group's spacing and width without including any end spaces
  • distance to centerlines allows whole section or group to be marked out quickly.

Type total width of wall or wall section

This field is required

Type number of work positions on wall/section

This field is required

Type width of work 1

This field is required

Type width of work 2

This field is required

Type width of work 3

This field is required

Type width of work 4

This field is required

Type width of work 5

This field is required

Type width of work 6

This field is required

Type width of work 7

This field is required

Type width of work 8

This field is required

Type width of work 9

This field is required

Type total width of all other works if >9

This field is required
total width of works
space available between works
even space between all works including ends

adjust including ends

  • set inter-work calc first/end

    Type width of desired inter-work horizontal space

    This field is required
    even first/end space
    available for first/end spaces
  • set first/end calc inter-work

    Type width of desired first / end horizontal space

    This field is required
    even inter-work space

adjust not including ends

  • set inter-work calc group

    Type width of desired inter-work horizontal space for section with zero ends

    This field is required
    width of group
    available for first/end spaces
  • set group calc inter-work

    Type your target overall group width with zero ends

    This field is required
    even inter-work space

distance to centerlines

  • set inter-work calc centers

    Type width of desired inter-work horizontal space for horizontal group

    This field is required

    Type width of first / end space where measurement commences

    This field is required
    work #
    edge to 1st center
    1st to 2nd
    2nd to 3rd
    3rd to 4th
    4th to 5th
    5th to 6th
    6th to 7th
    7th to 8th
    8th to 9th
    9th to 10th
  • own edge to center

    up to 10 works

    work #
    1
    2
    3
    4
    5
    6
    7
    8
    9
    10

step 3. individual works

details
  • enter work details: outer work dimensions
    • drop to fastener is to center of taught frame wire; or if 2 fasteners to top of D-rings; or stretcher depth eg. if on nails or screws. A negative drop can be used for outside fasteners, eg. pins in cloth tabs
    • inside adjust is for a two point hang only and is edges to D-ring centers; or, a set distance depending on installation method
  • enter vertical alignment or reference height
  • optionally add horizontal adjustments:
    • default zero (0) 'to previous edge' gives results table showing horizontals from work's own edge. When measuring from a previous work/edge add that distance
    • in addition to 'to previous edge' adjustment, an extra adjustment can be made if measuring 'to previous fastener'. Add previous work's distance to center; or, if using 2 fasteners, add previous work's inside adjustment. This is also useful for pre-planning.

vertical

Type aligment / reference height for works in decimal numbers e.g. mm or inches to 2 decimal places

This field is required

work details

Type width of work

This field is required

Type the height of work

This field is required

Type work drop to fastener

This field is required

Type inside adjustment for work if 2 fasteners used

This field is required

horizontal

Type horizontal distance to previous work or wall edge

This field is required

Type inside adjustment from work edge to fastener of previous work, eg. to center fastener or to 2nd if two

This field is required

vertical results

horizontal results

  • to previous edge
    previous edge to center
    if two fasteners:
    previous edge to 1st fastener
    distance from 1st to 2nd fastener
    distance from centerline to fasteners
  • to previous fastener
    previous fastener to center
    if two fasteners:
    previous fastener to 1st fastener
    distance from 1st to 2nd fastener
    distance from centerline to fasteners

specific purpose calculators

Specific purpose calculators for horizontal spacing, installing an individual work; and for a vertical group of works:

using "horiz"

  • enter data into the "inputs" section, ie. the section width, each work's width and how many works. The results provide options for adjsting your spacings in various ways

using "solo"

  • a pop-up lightbox form asks for all the inputs you need and provides all the results required to install a single work

  • enter work details data into the inputs section, ie. outer width, outer height, drop to fastener, and inside adjustment if using more that one fastener

vertical

  • decide on the work's vertical position. This can be done by placing the work on the wall and marking a key position (with pencil or painter'stape), ie. top edge, lower edge centerline etc.

  • alternatively, a decision can be made that the work should be at a particular height. For example, mid-line at 1450mm, or top edge or lower edge at a specified height. Input this vertical reference height

  • results are shown for three vertical height options ie. chosen reference height at top edge, mid-line or lower edge

horizontal

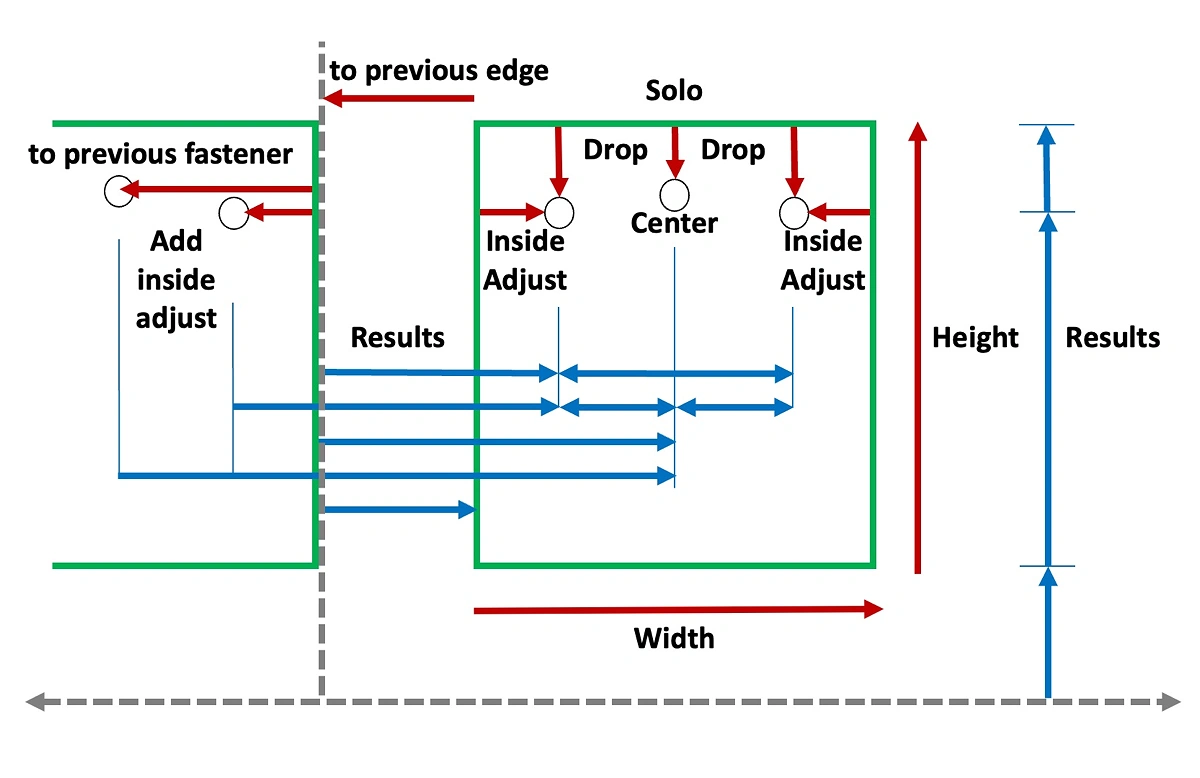
  • then optionally decide a relative horizontal position. If no horizontal position input is used the horizontal result measurements will show the results for the work's own outer width

  • option a) 'to previous edge' is to measure fastener positions from a previous work or wall edge

  • option b) 'to previous fastener' an additional previous work inside adjustment can be added. This is useful if you want to place fasteners before installing the works. Using option b) place a level (with a measure scale) with one end rested at zero under the previous work's fastener, then the horizontal distance to the first or center fastener can be marked quickly

  • a solo work's centerline can also be used to place one or two fasteners. For two fasteners the distance from the centerline to fasteners is provided in the results table

solo work diagram with previous work option

using "vert"

  • enter inputs for as many works as required up to a maximum of six. Inputs and results for both vertical and horizontal measurements are shown in the diagrams below

centers aligned

  • for center aligned groups a group section width needs to be set to establish a centerline
inputs and results for center aligned vertical group

edges aligned

  • the group's vertical edges can be aligned to the left or right
inputs and results for edge aligned vertical group

full pwa version at hangcalc.com

hangcalc screen shot

PEMDAS calculator included

for on-the-fly calculations, and has a tape to record results

tape of inputs

This field is required

Results area, expressions can be entered here

This field is required
  • extras

Useful resources

A4 planning notes template

pdf template for your layouts

  • great to use as a background in a notes app

A4 artwork measurement sheet

pdf for collecting artwork measurements

  • collect all you artwork measurements in one place before you begin
  • helps get you ready to use these calculators

art installation guide

doing an install?

  • some tips on art installation
  • outline of basic calculation methods

on viewing art

everyone has a unique viewpoint

the world's infinite and ubiquitous uniqueness changing from moment to moment requires a determined mental effort to break the bonds of 'ordinary' perception

unique viewpoints
top

solo work

work details

work width

Type width of work

This field is required

work height

Type the height of work

This field is required

drop to fastener

Type work drop to fastener

This field is required

if 2, inside adjust

Type inside d-ring adjustment for work if 2 fasteners used

This field is required

vertical position

reference height

Type aligment height for works in decimal numbers e.g. mm or inches to 2 decimal places

This field is required

vertical results

horizontal adjustments

details
  • default zero (0) 'to previous edge' gives results table showing horizontals from solo work's own edge
  • if measuring from a previous edge ie. previous work or wall edge, add that distance

to previous edge

Type horizontal distance to previous work or wall edge

This field is required
details
  • in addition to 'to previous edge' adjustment, an extra adjustment can be made if measuring 'to previous fastener'
  • add previous work's distance to center; or, if using 2 fasteners, add previous work's inside adjustment

previous fastener adjustment

Type inside adjustment from work edge to fastener of previous work, eg. to center fastener or to 2nd if two

This field is required

horizontal results

  • to previous edge
    previous edge to center
    if two fasteners:
    previous edge to 1st fastener
    distance from 1st to 2nd fastener
    distance from centerline to fasteners
  • to previous fastener
    previous fastener to center
    if two fasteners:
    previous fastener to 1st fastener
    distance from 1st to 2nd fastener
    distance from centerline to fasteners

Type your note data here for printout

This field is required

horizontal spacing

inputs

Type total width of wall or wall section

This field is required

Type number of work positions on wall/section

This field is required

Type width of work 1

This field is required

Type width of work 2

This field is required

Type width of work 3

This field is required

Type width of work 4

This field is required

Type width of work 5

This field is required

Type width of work 6

This field is required

Type width of work 7

This field is required

Type width of work 8

This field is required

Type width of work 9

This field is required

Type total width of all other works if >9

This field is required

Type your note data here for printout

This field is required

horizontal results

total width of works
space available between works
even space between all works including ends

adjust including ends

  • set inter-work calc first/end

    Type width of desired inter-work horizontal space

    This field is required
    even first/end space
    available for first/end spaces
  • set first/end calc inter-work

    Type width of desired first / end horizontal space

    This field is required
    even inter-work space

adjust not including ends

  • set inter-work calc group

    Type width of desired inter-work horizontal space for section with zero ends

    This field is required
    width of group
    available for first/end spaces
  • set group calc inter-work

    Type your target overall group width with zero ends

    This field is required
    inter-work space

distance to centerlines

  • set inter-work calc centers

    Type width of desired inter-work horizontal space for horizontal group

    This field is required

    Type width of first / end space where measurement commences

    This field is required

    up to 10 works

    work #
    edge to 1st center
    1st to 2nd
    2nd to 3rd
    3rd to 4th
    4th to 5th
    5th to 6th
    6th to 7th
    7th to 8th
    8th to 9th
    9th to 10th
  • own edge to center

    up to 10 works

    work #
    1
    2
    3
    4
    5
    6
    7
    8
    9
    10

vertical group

group overview

reference height

Type aligment height for vertical group in decimal numbers e.g. mm or inches to 2 decimal places

This field is required

number of works

number of works in vertical group

This field is required

even vertical space

even vertical space between works

This field is required

individual works

top-most work first
limit of 6
leave blank if unused

vertical inputs

work #

work height

drop to fastener

1

Type the vertical height of work 1

This field is required

drop to fastenerdrop to fastener

This field is required

2

Type the vertical height of work 2

This field is required

drop to fastenerdrop to fastener

This field is required

3

Type the vertical height of work 3

This field is required

drop to fastenerdrop to fastener

This field is required

4

Type the vertical height of work 4

This field is required

drop to fastenerdrop to fastener

This field is required

5

Type the vertical height of work 5

This field is required

drop to fastenerdrop to fastener

This field is required

6

Type the vertical height of work 6 and above

This field is required

drop to fastenerdrop to fastener

This field is required

group height

overall height

if target height

target group height

Type your target overall group height

This field is required

new even vertical space

vertical results

horizontal inputs

work #

work width

inside adjust

1

Type the width of work 1

This field is required

Type the inside adjustment of work 1

This field is required

2

Type the width of work 2

This field is required

Type the inside adjustment of work 2

This field is required

3

Type the width of work 3

This field is required

Type the inside adjustment of work 3

This field is required

4

Type the width of work 4

This field is required

Type the inside adjustment of work 4

This field is required

5

Type the width of work 5

This field is required

Type the inside adjustment of work 5

This field is required

6

Type the width of work 6

This field is required

Type the inside adjustment of work 6

This field is required

if group edge aligned

to group edge

add set distance before edge

This field is required

if group center aligned

group section width

width of wall section for the group, eg. widest work + 2x set inter-work space

This field is required

prev edge to centerline

horizontal results

Notes:
1. inputs

work details

work width =

work height =

drop to fastener =

inside adjust =

vertical

reference height =

horizontal

option to previous edge =

added previous inside adjust =

2. vertical results
a) mid-line at ref height

fastener height =

top edge height =

lower edge height =

b) top edge at ref height

fastener height =

mid-line height =

lower edge height =

c) lower edge at ref height

fastener height =

top edge height =

mid-line height =

3. horizontal results

to previous edge

previous work/edge to center =

if 2 fasteners, previous work/edge to 1st fastener =

distance from 1st to 2nd fastener =

and, distance from centerline to fasteners =

to previous fastener

previous work's fastener to center =

previous work's fastener to 1st fastener =

1. Overall wall setup notes

2. Horizontal spacing

Set section width =

Number of works =

Width 1 =

Width 5 =

Width 9 =

Width 2 =

Width 6 =

Width other =

Width 3 =

Width 7 =

Width 4 =

Width 8 =

Total width of works =

Total space available between works =

Even space between all works (inc ends) =

Options for end / inter-work space:

Set inter-work space = then first/end space =

Set first/end space = then inter-work space =

Set group inter-work = then group width =

3. Current individual work calculations

Alignment height =

Work width =

Work height =

Drop to fastener =

Inside adjust =

To previous edge =

Added previous inside adjust =

Vertical height of fastener(s) by alignment type

Mid-line aligned =

Top edges aligned =

Lower edges aligned =

Horizontal measurements

Previous work/edge to center =

If 2 fasteners, previous work/edge to 1st fastener =

Distance from 1st to 2nd fastener =

And, distance from centerline to fasteners =

To previous fastener

Previous work's fastener to center =

Previous work's fastener to 1st fastener =