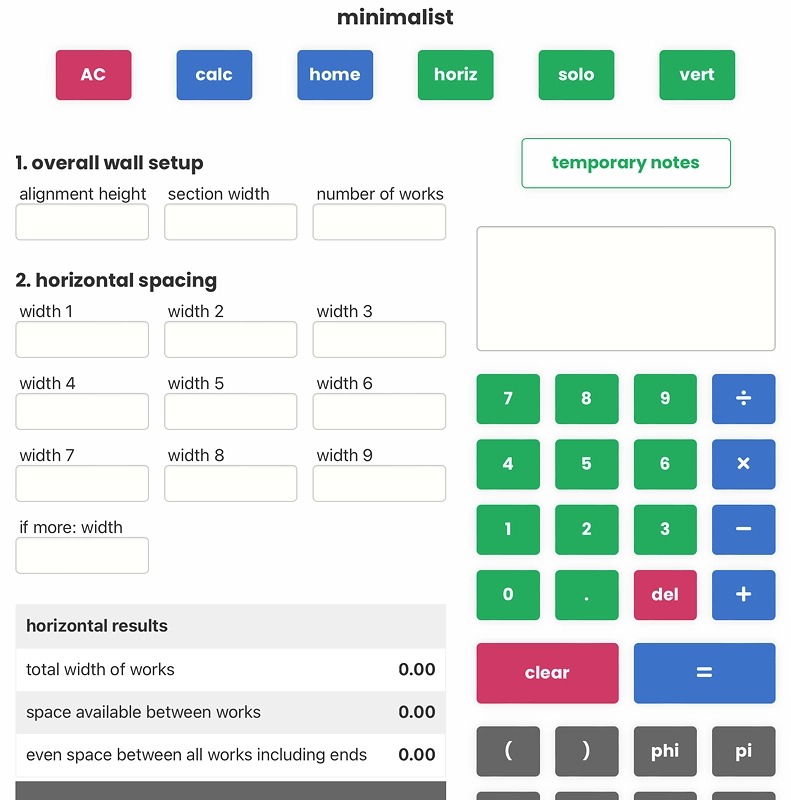
sharing a vision
with infinite viewpoints
sun in the bright grass
There are many ways to hang pictures depending on fastening methods available, personal preferences, tools and equipment etc. These can range from simple arbitrary placement, use of centerlines, center points or edges; and may use simple tools like a spirit level and tape measure, or precision location using lasers. All are perfectly valid methods.
If you consult YouTube or an AI Chatbot, chances are you will get complicated instructions often involving lots of painter's tape and placing mock-up layouts on the wall. I think these are often unnecessary and wasteful.
The approach I prefer is to simply lay the works out in front of the wall, or on the floor, then arrange and rearrange until the set feels right. Maybe so that no one piece dominates and there is an appealing distribution of content, colors and tones etc. After that, do a sketch on paper with key parameters, like alignment heights, inter-work and end spaces. These will set the framework. As a reference the center point (mid-line alignment height) is generally suggested to be 57 inches or 1450 mm high. Spacing between works will be closer in clustered works - perhaps 3 inches or 80 mm, but wider to expansive layouts. Centerline and other key positions are useful to mark on the wall with tape, eg. to mark golden ratio positions (eg. with scratchpad calculator's length/phi
) etc.
Then measure the works. Three or four measurements may be needed for each artwork:
vertical:
1) outer vertical height
2) drop to fastener(s)
horizontal:
1) outer horizontal width
2) inside adjustment to fasteners (if using more than one)
Armed with these measurements, use the calculator to determine fastener positions. Other distances used for positioning: vertical height on wall; horizontal inter-work or first/end spacing (ie. to previous edge); and, vertical inter-work spacing for a vertical group.
All this can be done without sticking mock-ups on the wall. Painters tape is super useful for marking start and end points, reference heights, and center points. But, there is no need to cover a wall with it. All the work can be done with a pencil, tape measure and spirit level (ideally one with a measurement scale on it).
I hope the calculators can be used to make relevant and helpful calculations for your purposes.
Input what you need to, choose the results you want
* the main calculator is for horizontal layouts
* use solo
to install works one by one in any position
* use horiz
to calculate horizontal spacings
* vertical groups use vert
button.
Have fun!
a pop-up lightbox form asks for all the inputs you need and provides all the results required to hang a single work
enter data into the inputs section, ie. a work's chosen reference height and other details. The results are shown for vertical height options (ie. top edge, mid-line or lower edge at the reference height level) and relevant horizontal measurements for one or two fasteners
you can use the main form or horiz
button to determine horizontal spacing. You can then use solo for each work in turn using the calculated horizontal space as the "to previous edge" entry
Works can also be placed arbitrarily or after pre-planning the set-up. For pre-planning solo results can be printed out with notes
solo
also includes an option to measure fastener positions from a previous work's last fastener. This is useful if you want to place fasteners before hanging the works. To use this feature add the inside adjustment for the previous work to the solo calculator. This allows you to measure from the previous work's last fastener, and this can sometimes speed up the process. For example, using a level with a measure scale, one end can be rested at zero under the previous work's fastener and the horizontal distance to the solo work's first or center fastener can be read and marked quickly.
centers aligned
edges aligned
for on-the-fly calculations, and has a temporary notes area
Results area, expressions can be entered here
This field is requiredthe world's infinite and ubiquitous uniqueness changing from moment to moment requires a determined mental effort to break the bonds of 'ordinary' perception
1. overall wall setup
Alignment height =
Set section width =
Number of works =
2. horizontal spacing
Width 1 =
Width 5 =
Width 9 =
Width 2 =
Width 6 =
Width other =
Width 3 =
Width 7 =
Width 4 =
Width 8 =
Total width of works =
Total space available between works =
Even space between all works (inc ends) =
Options for end / inter-work space:
Set inter-work space = then first/end space =
Set first/end space = then inter-work space =
Set group inter-work = then group width =
3. current individual work calculations
Individual work note:
Work width =
Work height =
Drop to fastener =
Inside adjust =
To previous edge =
Vertical height of fastener(s) by alignment type
Mid-line aligned =
Top edges aligned =
Lower edges aligned =
Horizontal measurements
Previous work/edge to center =
If 2 fasteners, previous work/edge to 1st fastener =
distance from 1st to 2nd fastener =
and, distance from centerline to fasteners =
Reference height =
To previous edge =
Work width =
Work height =
Drop to fastener =
Inside adjust =
Previous inside adjust =
Mid-line at ref height =
Top edge at ref height =
Lower edge at ref height =
Previous work/edge to center =
If 2 fasteners, previous work/edge to 1st fastener =
distance from 1st to 2nd fastener =
and, distance from centerline to fasteners =
Option:
Previous work's fastener to center =
Previous work's fastener to 1st fastener =